The Reverse Geocache™ Puzzle
[Author's note: This post is the first in a real-life story that ultimately took a full year and four chapters (1, 2, 3, 4) to tell. Read them all, then browse through the other surprising puzzle box stories that have popped up along the way.]
Early this summer, the friend who first introduced me to Arduino amazed us with the news that he was moving to France to get married. Once I recovered from the surprise, it occurred to me that putting together some sort of Arduino-based wedding present might be a uniquely fitting thanks for his years of friendship and for helping get me started in this delightful enterprise. And so after weighing several ideas — I didn’t fancy adding some ugly techno-junk to the pretty collection of tea cozies and china sets — I finally settled on building the device I describe here: a puzzle box that won’t open until it is taken to a certain location.
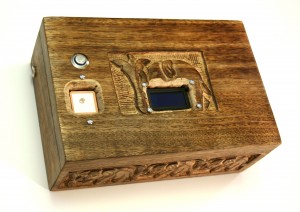
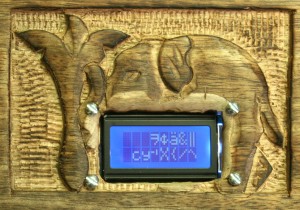
To better understand my conception, let’s fast forward and imagine the gift opening. The new couple, freshly back from their honeymoon, remove the wrapping to reveal a book-sized wooden box elaborately carved with elephant images. (I didn’t carve it; I bought it that way at World Market.) Mounted into the lid, perhaps incongruously, are an illuminated button, a small display, and a mysterious module that sharp-eyed readers might recognize as a GPS. There’s also some kind of connector tucked away on the box’s left side. More about that later.
What do they make of all this? It’s hard to guess, but naturally I imagine they might try to open it up and take a look inside. When they do, however, they find the lid stuck tight — it seems to be latched from the inside. Will they push the button? Pretty buttons are awfully hard to resist, so let’s assume so. The blue display fires up and displays a friendly, personal greeting:
Bonsoir, famille Immel!
This is attempt 1 of 50.
|
Huh?
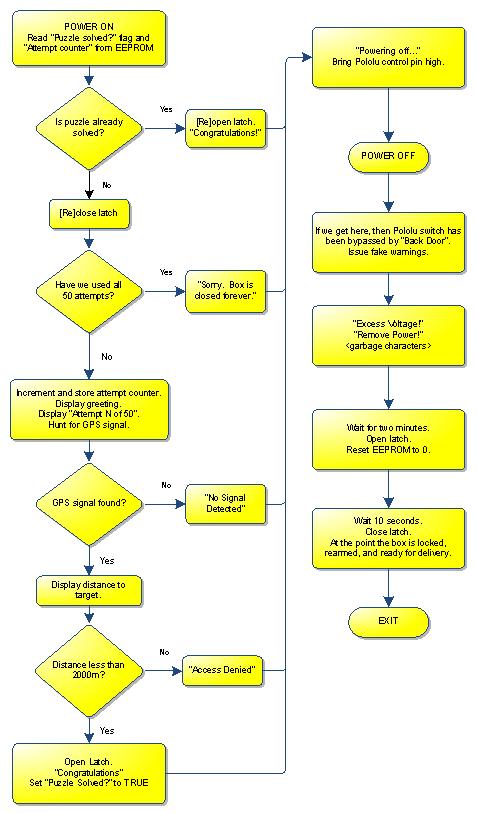
Now they don’t know this yet, but the box’s embedded electronics require a good GPS fix – something that’s probably hard to come by inside a Parisian apartment. And so the display flashes “SEEKING SIGNAL” for a couple of minutes and gives up.
No signal acquired...
Powering off...
|
Now my hope is that they’ll realize they need to take the box outdoors or near a window. Is that a stretch? I don’t think so. My friend is a patient fellow with an engineering background, so I expect he will at least try moving it before throwing it against the wall or chiseling off the hinges. Let’s assume, then, that they go outside and push the button again. This time the series of messages is different:
This is attempt 2 of 50.
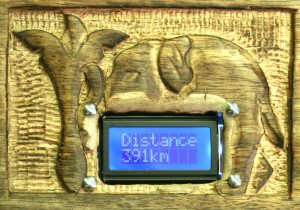
Distance 391km
*Access Denied*
Powering off...
|
Hmm. What does “Distance 391km” mean? “Access Denied” suggests that getting inside the box is indeed the objective of all this button pushing. Just for fun, let’s try again.
This is attempt 3 of 50.
Distance 391km
*Access Denied*
Powering off...
|
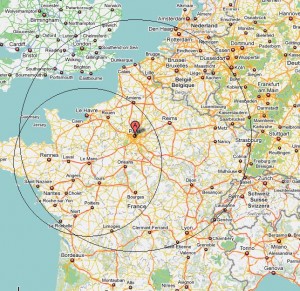
Uh oh. We seem to be consuming our limited supply of “attempts”. The “No signal” problem seems to be solved, but the message “Distance 391km” remains puzzling. Does the box know its own location? Is there something 391 kilometers away? London? The Hague? A circle of that radius drawn around Paris intersects quite a few interesting places in France, England, Holland, Switzerland, and Germany.
Knowing my friend, he will eventually think to move the box to a new location to see how the message changes. Let’s imagine, then, that he hops in his car and motors down the A11 to the famous city of Le Mans, about two hours to the southwest. After a brief tour of the cathedral and a snack at a sidewalk café, he pulls the elephant box from his backpack and pushes the button again.
This time the display is once again slightly different:
This is attempt 4 of 50.
Distance 226km
*Access Denied*
Powering off...
|
Aha. We seem to be getting somewhere. If we are in fact looking for a specific place, it would appear that it is 391 kilometers from Paris but only 226 from Le Mans. As you can see by the map in Figure 3, there are only two places on earth that meet these criteria – a spot just off the northern Brittany coast, and a rural area in the southwest near Bordeaux. And, as my friend is aware, one of these can be quickly eliminated simply by taking a third “reading” in a new spot.
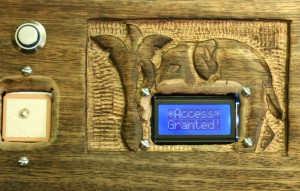
I suspect that from here things will proceed relatively quickly. My friend will triangulate that the “magic spot” is Île-de-Bréhat, a tiny island just a short ferry ride off the northern coast of Bretagne. If and when the couple do bring the box here, they’ll be greeted with a congratulatory “Access Granted!” and the whir of a motor announcing that the treasure inside is about to be finally revealed!
Hardware
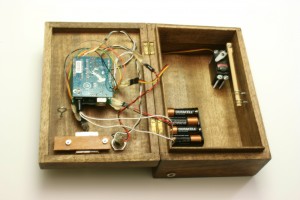
The electronics for this project are fairly simple. At the core, of course, is the Arduino, surrounded by a handful of devices that talk harmoniously through various native and third-party libraries. The peripherals are wired to a custom “shield” that I soldered together. The shield design makes the system modular and easy to disassemble for moving. Power is provided by 4 AA lithium batteries mounted in the box’s interior.
Major components
1 Arduino Duemilanove
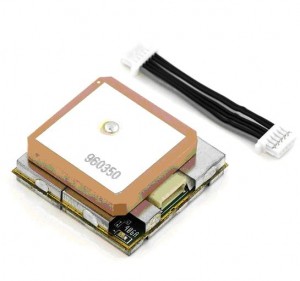
1 USGlobalSat EM-406A GPS module
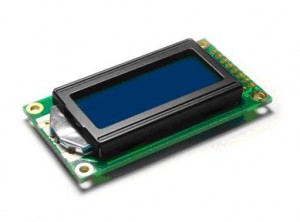
1 8×2 blue backlight HD44780 LCD
1 Hitec HS-311 servo motor
1 illuminated pushbutton
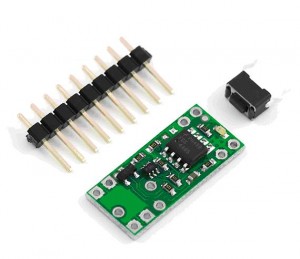
1 low voltage Pololu power switch
1 2.5mm female DC power connector
1 Adafruit Arduino prototype shield
1 ornamental box
Minor components
1 severed chopstick used as latching dowel
3 #14 eyelet screws
1 Battery pack with 4xAA lithium batteries
Various mounting screws and glue
Wire, headers, solder, and other circuit connecting items
I designed this project to last a long time. The batteries are locked inside the box and can’t be replaced if they run down — not while the puzzle remains unsolved, anyway — so it’s important to conserve power. That’s why a given “session” lasts at most 2-3 minutes before the system powers off. Furthermore, the owner is allowed only 50 attempts to discover the box’s secret, so the active lifespan of the batteries need be no more than about 150 minutes. Between sessions, the electronics draw virtually no power and should last idle for years.
The secret to this power conservation is the clever little Pololu switch, which gives a circuit the ability to completely turn itself off through software. When you push the button, it latches and distributes power to the system. When the sketch decides it’s time to shut down — either because it can’t find a GPS signal or it’s not close enough to the target — it simply brings the Pololu’s power control pin high, cutting power. In this “off” state the switch draws just 0.01 microamps.
Like most GPS units, the EM-406A generates a stream of NMEA position data. This stream enters the Arduino via a “soft” serial port managed by my NewSoftSerial library. The NMEA data is parsed into latitude/longitude using TinyGPS, a popular library I built especially for this project. If the GPS is getting a good fix, the box can determine its location within 10 meters and, through a simple calculation, how close it is to the target.
The display is an HD44780-compatible device controlled by the Arduino LiquidCrystal library. I wanted to incorporate some visual effects like flashing and scrolling, so my sketch contains several custom display routines. These were carefully written so as not to block the all-important serial input stream coming from the GPS.
The internal latch is built around a Hitec servo, three eyelet screws, and, as a sentimental salute to the little Chinese restaurant my friend and I used to eat at, a dowel made from one of its chopsticks. One chopstick end is attached to the servo arm, and the other threaded through the two eyelet screws mounted into the box bottom. The servo operates in one of two positions – “open” and “closed”. When instructed to close, it drives the chopstick laterally through a third eyelet screw hanging from the box lid. At this point, the box is latched. Once the puzzle is finally solved, the servo pulls the chopstick back, and the box can again be opened.
Software
The box is running the Arduino version 0016 framework. The sketch I wrote uses native libraries Serial, Servo, and LiquidCrystal, as well as several of my own: TinyGPS, NewSoftSerial, PString, Streaming, and Flash. My libraries are freely available for download at Arduiniana.org.
Conceptually, the software is fairly straightforward. At power up, the system hunts for a GPS signal. If it detects that the box is within 2 kilometers of the target spot — in this case the center of the little island — it unlocks the latch. Otherwise, it displays the somewhat cryptic “Distance: nnn km” and keeps the latch firmly locked.
The Back Door
It may seem risky to create a device that can only be activated a limited number of times before it locks permanently. What happens if the bride’s four-year-old gets hold of it? What if the batteries unexpectedly run out? What if, despite all my care and attention, there are still bugs in the implementation? Will the treasure inside be forever sealed? To address these concerns, I built a “back door” into the design. This is where the mysterious 2.5mm coaxial connector to the left in Figure 1 comes in.
If you apply some current here at a reasonable voltage, the system will power up just as if you pressed the button. But since this circuit bypasses the Pololu switch, when the box claims to be “Powering down”, it is actually lying. Instead, after a two-minute delay, the latch opens, regardless of where the box is actually located. This gives the sheepish designer (me) emergency access and one more chance to replace the batteries or repair the latest design flaw.
You might question whether it’s a good idea to leave such a gaping back door. After all, it’s a lot easier for my friend to open the box by simply plugging it in than driving it the 391 kilometers to Bréhat. Quite true. So to dissuade him from snooping too far down this path, I built in a few frightening messages. Remember, he has no idea how to use this “back door” or what voltage and current to apply. If he does figure out how to power the box this way, I feel fairly confident that whatever satisfaction he gains will rapidly disappear when the LCD starts flashing the completely fake warnings
Excess Voltage!
Remove Power!
|
And if these aren’t discouraging enough, they are followed by a blast of random “garbage”, suggesting that a critical failure is underway. (See Figure 10.) Whoever opens the box this way will have to stare at these ominous characters for a full two minutes.
Last minute disasters
Just a couple of days before I left for France I made a pretty serious mistake. At the time I had completed the physical construction and was just beginning the first full-scale closed-lid tests. Everything was going swimmingly – so smoothly, in fact, that I became a bit cavalier about my methodology. To address an intermittent problem, I made the last-minute decision to upgrade my system software. Reflecting back, I should have done plenty of preliminary “open box” tests before sealing it up; instead, riding the wave of my enthusiasm into disaster, I uploaded the new version, confidently closed the lid, and pressed the button. The latch engaged normally, but then the whole system went haywire. The motor began jerking crazily and the LCD limped along, displaying dimly only the top halves of each message. Soon I discovered that I had locked myself out of my own box and that disassembling it was the only way to recover. Because I had designed it to be somewhat tamper proof, this was far from easy. Ultimately, I had to break a bracket to get a screwdriver far enough into the interior to pry open the latch.
In France I had left myself just one short day to reassemble the box (which had been taken apart to increase my chances with airport security), run some last-second tests, and perform the final reset. When it came time to rearm it, something you do by connecting power to the “back door” for four minutes, I found that I had brought the wrong power supply with me. I fruitlessly combed the house I was staying in for a telephone or router with a 2.5mm connector, and then tried desperately to locate the French equivalent of a Radio Shack. After my panic subsided I realized I could just jimmy up what I needed with a couple of paper clips. It wasn’t pleasant or easy to hold those clips in place for four minutes, but I finally did manage to rearm the box with mere hours to go.
Frequently Asked Questions
What happened when they unwrapped the box?
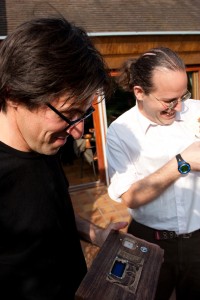
The day after the wedding, the bride’s family hosted a brunch in the back lawn of their beautiful country house. I hadn’t expected to be present at the opening, but at one point I noticed some furtive activity in the corner of the lawn and saw that the box was being passed around, accompanied by much head scratching and gesturing in my direction. My friend, who had apparently already consumed three “attempts”, was darting back and forth exhorting everyone in halting French “Ne poussez pas le bouton!” (“Don’t push the button!”). To his dismay, his new father-in-law didn’t understand and pushed it anyway. Several people approached me to ask questions about the box, which I apologetically declined to answer. At one point a friend of the family, a charming gentleman from up the street, said to me with a thick accent, “You are — how you say in English? — a BASTARD!” That one comment made this whole project worthwhile. As of this writing I do not think they have yet managed to open the box.
What did you put inside?
With all the electronics, there wasn’t much room inside the box for anything too substantial. I put in a few local (US) gift cards to entice them to visit soon, a set of Kazuo Ishiguro audio books (on a USB key), and an overly sentimental card. And of course, as I pointed out in the card, if either of them fancies doing a little Arduino development, there’s a perfectly good Duemilanove to play with, not to mention an LCD, a servo, and a GPS.
How did you choose the target location?
Île-de-Bréhat, a charming island where motorized vehicles are prohibited, is a special place for this couple. It was while my friend was filming a movie here that he first began to realize his feelings for the young lady starring in it. And she for him, if I understand correctly. To help matters, the bride’s family owns a house here, making it a doubly attractive destination. (I may be a bastard, but I’m not going to make them travel 400 kilometers to some random, isolated location just to open a few gift cards.)
How did you get it through airport security?
I worried a lot about this. At first, when I was not certain whether I would be able get to France to attend the wedding, I had thought to present them the fully “armed” box while they were visiting the US. Fortunately, someone pointed out the foolishness of this idea. Can you imagine the interview at airport security when the hand soldered electronics show up in the X-ray?
Sir, did you pack this yourself?– No.
What’s inside?– I have no idea.
Can you open it please?– Nope.
Eventually, I decided that the best strategy was to disassemble it as much as practically possible and hope that none of the individual pieces were sufficiently suspicious to warrant being detonated on the tarmac. This seemed to work. I brought the disassembled box on two major trips without a hint of trouble.
Why limit the number of attempts to 50?
Two reasons. First, a puzzle is just more exciting if it is bounded. If it’s fun to solve a Sudoku, how much more fun is it to try and do it in under ten minutes?
The second reason is a practical one. I needed some way to make sure that power consumption would not end up being a problem. How disappointing would it be if, after all the work I put into it, the batteries ran out and the puzzle was ruined? Constraining the number of attempts helps ensure that this won’t be an issue.
The number 50 has no special significance. 25 or 20 would probably have worked just as well.
Why the 2000-meter tolerance?
There is always a little bit of error in a GPS reading, so some tolerance is necessary. The island is about 4 kilometers across, so setting the tolerance at 2000 meters forces them to actually ferry across to it without constraining them to any particular part.
Conclusion
Building this project was a joy. It was rewarding to conceive of a relatively unique GPS application and to work through the various problems as they arose. Designing the latch, for example, was a challenge I spent a good deal of time on. My experience solving mechanical problems is fairly limited, but I’d like to think that the next time I build something with a mechanical component I’ll be able to approach it with a little more savvy. Meanwhile, when you think about all the cheap sensors, displays, lights, motors, modules, radios, and buttons you can attach to an Arduino, you realize that imagination is the only constraint on the kinds of projects that can be built. This little box is a novel way of combining a GPS, a servo, a button and a display. How many more marvelous combinations lurk out there, if only someone has the imagination to put them together the right way?
[Make sure you read the sequel to this story when you're finished here.]


October 18th, 2009 → 1:34 pm
[...] This post was mentioned on Twitter by Miles Burton, rethinker_news. rethinker_news said: http://bit.ly/2GtQt http://bit.ly/19vryz [...]
October 19th, 2009 → 6:01 am
[...] gift for his friend who was moving to France. After experimenting with a few things, he settled on creating a puzzle box that would only open in a certain location. Since his friend introduced him to the Arduino, he fittingly used one in the design, along with a [...]
October 19th, 2009 → 6:31 am
[...] puzzle de geocaching inverso es realmente ingenioso: lo creó Mikal utilizando Arduino, y básicamente consiste en una caja [...]
October 19th, 2009 → 6:57 am
[...] just what Mikal did for the friend who introduced him to Arduino tinkering. He constructed the Reverse Geocache Puzzle, a wooden box that would only be unlocked when within 2km of a location Mikal preprogrammed into [...]
October 19th, 2009 → 7:24 am
Social comments and analytics for this post…
This post was mentioned on Twitter by TeamMCS: http://bit.ly/3Y2nQT Great #Arduino project/gift…
October 19th, 2009 → 8:12 am
[...] le bon endroit et la boite s’ouvrera http://arduiniana.org/projects/the-reverse-geo-cache-puzzle/ #geocache #arduino #gps [...]
October 19th, 2009 → 8:37 am
[...] This post was Twitted by Hardwarer [...]
October 19th, 2009 → 8:47 am
[...] a servo, and a GPS. I guess the puzzle itself is present enough, really. Pretty cool stuff, no? [Arduiniana via [...]
October 19th, 2009 → 10:43 am
[...] This might not be the finest crafted of gifts, but the concept and thought behind it are wonderful. It is a gift box that only opens at a certain location. A kind of reverse-geocache. Read the full story behind it and details of its creation here. [...]
October 19th, 2009 → 11:37 am
[...] Geocaching inversoarduiniana.org/projects/the-reverse-geo-cache-puzzle/ por pcmaster hace pocos segundos [...]
October 19th, 2009 → 1:24 pm
[...] GPS Hunt Project is very interesting, the box is electronically locked and the only way to open it (without using [...]
October 19th, 2009 → 4:04 pm
[...] a wonderful hardware project, very nicely written up by Mikal Hart. Possibly-related posts:Drop it in the box I’ve only [...]
October 19th, 2009 → 4:13 pm
[...] This post was Twitted by darkbalder [...]
October 20th, 2009 → 2:17 am
[...] like to Geo cache? This is pretty cool. Reverse Geo Caching puzzle. http://arduiniana.org/projects/the-reverse-geo-cache-puzzle/ [...]
October 20th, 2009 → 10:06 am
[...] This GPS Hunt Project is very interesting, the box is electronically locked and the only way to open it [...]
October 20th, 2009 → 1:01 pm
[...] It is actually a really cool idea if you or someone you know loves to solve puzzles and mysteries. Then not only could you give them a cool gift, but you could make sure they’ve worked hard to get their hands onto it. The box was originally built by Makal Hart as a wedding gift. On the top it features a button and an LCD display. You can only press the button 50 times, but every time you do it’ll tell you how many kilometers you’re away from the spot you need to be at. You can check out a more detailed look on the box from the creator’s perspective by going here. [...]
October 20th, 2009 → 4:44 pm
[...] Read | Permalink | Email this | Comments [...]
October 20th, 2009 → 9:46 pm
[...] arduiniana Compartir Si te gustó este post, agrega tec.nologia a tu lector RSS | 0 comentarios Por tecnologia tec.nologia Tags cajas, cajas puzzle, gps, puzzles October 21st, 2009 @ 4:46 am [...]
October 20th, 2009 → 10:14 pm
[...] Arduino y fué creado por Mikal, El funcionamiento es sencillo: Es una caja que tiene un sistema de GPS que sólo se puede abrir si [...]
October 22nd, 2009 → 11:41 pm
[...] what’s in the box with the GPS screen? Gift cards. Mikal has been getting inundated with orders to make more of these one-off boxes which took him nine months to [...]
October 23rd, 2009 → 6:01 am
[...] Geocache Puzzle. A device based on a simple concept that is getting a lot of coverage these days. Mikal Hart has certainly developed an interesting GPS box. A box that will tell you where it will open but [...]
October 27th, 2009 → 5:57 am
[...] have two immediate reactions to a story about someone constructing a box that will only open at specific coordinates as a wedding gift. First, I am forced to wonder why I have never been given such a thing–my [...]
October 27th, 2009 → 7:56 am
[...] Bastler Mikal Hart drehte dieses Konzept um und konstruierte für einen alten Freund als Hochzeitsgeschenk eine [...]
November 5th, 2009 → 12:22 pm
[...] The Reverse Geocache Puzzle by Mikal Hart which is a puzzle box that only opens up at specific locations [...]
November 10th, 2009 → 6:01 am
[...] esto es lo que se le ocurrió al buen Mikal Hart — The Reverse Geocache Puzzle — para la boda de un buen amigo suyo y a quien en verdad [...]
November 11th, 2009 → 11:41 am
[...] Ce puzzle de geocaching inversé est réellement ingénieux : Mikal l’a créé en utilisant Arduino, et il consiste basiquement en boîte j’offre (des mariages) qui pouvait seulement être ouvert quand il était physiquement situé dans un lieu concret du monde. Dans son intérieur il y avait un GPS qui contrôlait un mécanisme qui bloquait la serrure, qui serait seulement ouverte après être arrivé aux coordonnées correctes, nourri par une batterie. À travers d’un écran, et après une pulsation, il indiquait pendant trois minutes la distance à l’objectif. Tout un cadeau geek avec un style, terriblement ingénieux et amusé pour les amants des puzzles. § Hack-a-day. # Un lien Permanent Posted by lisa conley at 10:41 AM [...]
November 12th, 2009 → 10:50 am
[...] Dieses Puzzle von umgekehrtem Geocaching ist wirklich sinnreich: Es hat Mikal geschaffen, Arduino benutzend, und hauptsächlich besteht es in einer Kiste ich schenke (von Heiraten), der nur geöffnet sein konnte, wenn er in einem konkreten Ort der Welt physisch gelegen war. In seinem Innenraum gab es einen GPS, der einen Mechanismus kontrollierte, der das Schloss blockierte, das nur ernährt von einer Batterie geöffnet werden würde, nachdem er zu den fehlerfreien Koordinaten kommen würde. Über einen Schirm zeigte er die Entfernung und nach einem Pulsschlag, während drei Minuten im Ziel an. Das ganze Geschenk geek mit Stil, fürchterlich sinnreichem und unterhaltenem für die Liebhaber der Puzzles. § Hack-A-Day. # Bleibende Verbindung Posted by Lupe Mura at 9:50 AM [...]
November 12th, 2009 → 5:10 pm
[...] Эта головоломка обратного geocaching действительно изобретательная: это создал Mikal используя Arduino, и главным образом он состоит из ящика я дарю (свадеб), что только мог быть открытым, когда он был физически расположенным в конкретном месте мира. В его внутреннем помещении был GPS, который контролировал механизм, который блокировал замок, который только открылся бы, прибыв в правильные координаты, питаемый батареей. Через экран, и вслед за пульсацией, он показывал в течение трех минут дистанцию в цель. Целый подарок geek со стилем, ужасно изобретательным и развлеченным для любовников головоломок. § Hack-a-day. # Постоянное соединение Posted by Lupe Mura at 4:10 PM [...]
November 16th, 2009 → 7:13 am
[...] LogTools for making Garmin custom raster mapsReverse Geocaching PuzzleState Parks permit sales up [...]
November 18th, 2009 → 6:31 pm
[...] good friend David Simpson sent me an email tonight with a link to a really cool story. I love a good story and I love a good gadget. Make it a 3 part story about [...]
November 19th, 2009 → 3:02 am
[...] you don’t see everyday, a DIY reverse geocache puzzle box, given as a wedding gift. Using the Arduino prototyping platform and a GPS device, it will lead you to a specific location on the globe, before [...]
November 20th, 2009 → 4:57 am
[...] http://arduiniana.org/projects/the-reverse-geo-cache-puzzle/ [...]
January 14th, 2010 → 7:30 pm
[...] was checking out the new posts on hackaday.org when I bumped into The Reverse Geocache Puzzle™ made by Mikal [...]
January 14th, 2010 → 9:03 pm
[...] Frustromantic Box, Part 1 A few months ago, Hack A Day featured an ingenious hack called the Reverse Geocache Puzzle by a gentleman named Mikal Hart (please note that “Reverse Geocache Puzzle” is [...]
January 15th, 2010 → 3:27 pm
[...] Box, Part 2: Assembly The Frustromantic Box is my implementation of Mikal Hart’s Reverse Geocache Puzzle. In Part 1 of this series I gave an overview of the project and its parts list. This post [...]
January 20th, 2010 → 12:25 am
[...] I had a real problem processing the output of the PNA4612 module when the batteries are even slightly discharged. This might be something I could correct in software, but if I were doing it again, I’d probably just run a barrel jack through the side of the box, similar to what Mikal did on the original puzzle box. [...]
January 23rd, 2010 → 12:39 am
[...] box that can only be opened if a specific morse code sequence is entered. His starting point was a Reverse Geocache Puzzle he’d read about on Hack a Day, where a person has to bring a box to specific coordinates to release [...]
January 23rd, 2010 → 4:21 pm
[...] box that can only be opened if a specific morse code sequence is entered. His starting point was a Reverse Geocache Puzzle he’d read about on Hack a Day, where a person has to bring a box to specific coordinates to [...]
February 18th, 2010 → 5:06 pm
[...] The Reverse Geocache Puzzle ™ | Arduiniana "The new couple, freshly back from their honeymoon, remove the wrapping to reveal a book-sized wooden box elaborately carved with elephant images. (I didn’t carve it; I bought it that way at World Market.) Mounted into the lid, perhaps incongruously, are an illuminated button, a small display, and a mysterious module that sharp-eyed readers might recognize as a GPS. There’s also some kind of connector tucked away on the box’s left side." (tags: arduino geocaching geodata location projects ideas) [...]
February 25th, 2010 → 2:23 pm
[...] Mikal Hart – Reverse Geocache box [...]
March 10th, 2010 → 12:04 am
[...] couple months ago I saw this awesome project and realized that I had a couple of the parts already, so it got into my head that I could build [...]
March 14th, 2010 → 1:43 pm
[...] up was a guy called Mikal Hart who’s invented the “Reverse Geocache box“. I expect you know what one of these is – but if you don’t the shortened [...]
April 17th, 2010 → 5:19 pm
[...] الصندوق المتصل بالقمر الصناعي عبارة عن قطعة خشبية من النوع الذي من الممكن أن تجده [...]
May 16th, 2010 → 5:29 pm
[...] inspiration from Mikal Hart’s Reverse Geocache Puzzle, I wil be constructing a gps scavenger hunt. Upon completion, the box will be locked from the [...]
June 18th, 2010 → 3:22 pm
[...] Markus on Jun.19, 2010, under Electronics A few months ago I stumbled across the very first Reverse GeoCache project by Mikal Hart. I was fascinated by the idea and decided to build one of my [...]
June 22nd, 2010 → 5:17 am
[...] latest version of Mikal Hart’s original reverse geocache puzzle–a box that only opens in one location on the Earth’s surface–is by Markus. At [...]
June 23rd, 2010 → 4:20 pm
[...] featured before. Markus has made a project he calls the Little Reverse GeoCache, it is based on a similar project that was made by Mikal Hart. The box can only be opened when it is in the correct location, the trick is that the location is [...]
June 24th, 2010 → 4:03 am
[...] El proyecto es un DIY por lo que podemos, si tenemos las ganas y los conocimientos llevarlo a cabo y no se ustedes, pero lo primero que me viene a la mente es por ejemplo: Una propuesta de matrimonio muy original con un estilo diferente. [...]
June 24th, 2010 → 3:22 pm
[...] featured before. Markus has made a project he calls the Little Reverse GeoCache, it is based on a similar project that was made by Mikal Hart. The box can only be opened when it is in the correct location, the trick is that the location is [...]
June 25th, 2010 → 5:46 am
[...] proyecto es un DIY por lo que podemos -si tenemos las ganas y los conocimientos llevarlo a cabo- animarnos a hacer [...]
July 7th, 2010 → 12:04 pm
[...] doesn’t support so I will just ignore them), Cache In Trash Out, and the locationless “Reverse Caches” which sound mega exciting, but I don’t believe we have any in the UK. Reverse caches [...]
July 11th, 2010 → 4:32 am
[...] A Day en artikkel om en fyr som hadde laget en reverse geocache. Dere kan lese om hele prosjektet her. I bunn og grunn så er prinsippet at man får en boks som er programmert med en fast geo-lokasjon. [...]
July 18th, 2010 → 2:37 pm
[...] gift for his friend who was moving to France. After experimenting with a few things, he settled on creating a puzzle box that would only open in a certain location. Since his friend introduced him to the Arduino, he fittingly used one in the design, along with a [...]
August 8th, 2010 → 2:07 pm
[...] Mikal Hart usando el sistema Arduino. Puedes encontrar toda la información sobre este proyecto en: The Reverse Geocache Puzzle. También puedes encontrar más información en microsiervos. Arduino, batería, caja de [...]
August 16th, 2010 → 10:22 pm
[...] featured a cool GPS Puzzle Box earlier this year that Markus built. It was based on a version that Mikal Hart created. Turns out there is quite a bit of interest in these GPS Puzzle Boxes, Mikal has since written a [...]
August 18th, 2010 → 5:00 pm
[...] featured a cool GPS Puzzle Box earlier this year that Markus built. It was based on a version that Mikal Hart created. Turns out there is quite a bit of interest in these GPS Puzzle Boxes, Mikal has since written a [...]
September 5th, 2010 → 11:12 pm
[...] Leave a Comment via arduiniana.org [...]
September 6th, 2010 → 10:01 am
[...] .:arduiniana.org-> Share this: [...]
September 20th, 2010 → 3:43 am
[...] last night New EC2 Features: Tagging, Idempotency, Filtering, Bring Your Own Keys JDK 7 Features The Reverse Geocache Puzzle Box Everyday at Vexed we round up the industry stories that we find interesting and insightful. These [...]
September 21st, 2010 → 3:34 pm
[...] The Reverse Geocache Puzzle Box [via] [...]
September 26th, 2010 → 6:30 pm
[...] unlock a secret temple. After all, one inventor using Arduino and GPS geolocation already made a wedding gift puzzle box that only opens when it’s taken to a small island near [...]
September 27th, 2010 → 9:23 am
[...] was inspired by a real product, that uses a GPS-based lock that will only open in one location on earth. Be sure to read the [...]
September 28th, 2010 → 4:02 pm
[...] questo The Reverse Geocache™ Puzzle Box e poi il seguito: cinque settimane dopo, le riflessioni su questo mondo di guardoni e finalmente [...]
September 28th, 2010 → 9:14 pm
[...] my Mikal Harts “Reverse Geocache Puzzle” and Russ Weeks “Frustromantic Box” I thought I’d try build my own and use [...]
October 5th, 2010 → 4:38 am
[...] engineer who had the inspired idea to use reverse geocaching to design a wedding present — a puzzle box that only opens on one spot on the [...]
October 6th, 2010 → 9:57 pm
[...] and programming. Tons of cool projects have been created with the Arduino, including the Reverse Geocache Puzzle, high altitude balloons, and even lift status displays for Copper Mountain Resort. The new Arduino [...]
October 16th, 2010 → 9:56 am
[...] Idee! Zur Bastelanleitung… Permalink — Kategorie: Randnotiz · Worthwhile — Hirschi @ 6:55 — [...]
October 18th, 2010 → 10:52 am
[...] wedding gifts go, this reverse geocache ranks amongst the finest. Filed under geocaching Comment (RSS) [...]
October 27th, 2010 → 1:46 pm
[...] Link | Part 2 of the story – via Gizmodo [...]
October 31st, 2010 → 3:47 pm
[...] A puzzle box that won’t open until it is taken to a certain location. Bron: Arduiniana [...]
November 10th, 2010 → 2:14 am
[...] [...]
November 19th, 2010 → 12:40 pm
[...] over de Reverse Geocache Puzzle Box. Erg mooi uitgevoerde ‘omgekeerde’ geocache die alleen open gaat op een vooraf [...]
December 14th, 2010 → 6:34 pm
[...] you thought of making a fun Geocache box for outdoor adventure or a wonderful reverse-Geocache box for friends or loved ones? Maybe you want a GPS tracker for field trips or position-sensitive [...]
December 29th, 2010 → 12:40 am
[...] exist endless ways that you can use a GPS sensor in your projects. Geocaching and reverse geocaching are just two typical applications. Last time I made an attempt to use GPS with Arduino and my Phi-1 [...]
December 31st, 2010 → 1:39 pm
[...] project was inspired by the “Reverse Geocache Puzzle Box“, an idea that has been duplicated a few times. For Christmas this year, I drew my [...]
January 3rd, 2011 → 7:11 pm
[...] Mikal. n.d. “The Reverse Geocache™ Puzzle Box.” Arduiniana. http://arduiniana.org/projects/the-reverse-geo-cache-puzzle/ (Accessed October 4, 2010). Categories : [...]
January 23rd, 2011 → 11:24 pm
[...] had read The Reverse Geocache Puzzle story awhile back and thought it was a fantastic idea. As I was thinking about a creative way to [...]
March 26th, 2011 → 2:23 pm
[...] what’s in the box with the GPS screen? Gift cards. Mikal has been getting inundated with orders to make more of these one-off boxes which took him nine months to [...]
April 21st, 2011 → 10:49 am
[...] PS: I know these last few posts aren’t about Geocaching, but bear with me. I am learning this stuff so I can create my own version of the Reverse Geocache… [...]
May 21st, 2011 → 10:20 pm
[...] since reading about the (original) Reverse Geocache a few months ago, I had wanted to build one. Except for the box itself, I already had all of the [...]
May 30th, 2011 → 6:30 am
[...] interesting examples of physical computing change the way we interact with technology. Take the GPS locked treasure box, which will only unlock at particular coordinates, telling the user how far away the correct [...]
June 5th, 2011 → 3:38 pm
[...] not know about, and I stumbled upon something called reverse geocaching. You can read about it in Mikal Hart’s post (recommended). Basically, The idea is that you give someone a locked gift box, that they cannot [...]
June 27th, 2011 → 2:43 pm
[...] the-reverse-geo-cache-puzzle und http://arduiniana.org/projects/the-reverse-geo-cache-puzzle/ [...]
July 29th, 2011 → 5:58 pm
[...] makes it possible for these people to make smart craft items. Some examples of such items are this “reverse geocache” wedding gift box, and a bicycling jacket with turn signal lights embedded in [...]
July 29th, 2011 → 9:29 pm
[...] unlock a secret temple. After all, one inventor using Arduino and GPS geolocation already made a wedding gift puzzle box that only opens when it's taken to a small island near [...]
July 30th, 2011 → 8:59 am
[...] even the story about the wedding gift a man made for his newlywed friends which consisted of a locked box that had a butt…. The box said the newlywed couple would have 50 presses of the button to figure out how to open [...]
November 3rd, 2011 → 2:29 pm
[...] The Reverse Geocache Puzzle ? | Arduiniana Delicious tags: puzzles "I finally settled on building the device I describe here: a puzzle box that won?t open until it is taken to a certain location … Mounted into the lid, perhaps incongruously, are an illuminated button, a small display, and a mysterious module that sharp-eyed readers might recognize as a GPS." [...]
July 4th, 2012 → 1:12 pm
[...] * Reverse Geocaching – Noch so ein talentierter Bastler, der hier Boxen für Reverse Geocaching vorstellt. Weitere Infos zum Thema gibts auch auf dieser Seite. [...]
July 23rd, 2012 → 10:36 am
[...] seeing a project from Mikal Hart called The Reverse GeoCache™ Puzzle Box, I knew that I had to build one. My girlfriend and I really enjoy geocaching together, so I [...]
August 19th, 2012 → 9:17 pm
[...] Check out the full write-up and build here [...]
January 30th, 2013 → 6:26 pm
[...] stumbled across a link some time ago that showed how Mikal Hart built a Reverse Geocache(TM) as a wedding gift using an Arduino, a GPS, a small LCD display and a servo to drive the lock. For [...]
February 8th, 2013 → 3:20 pm
[...] Hart’s original Reverse Geocache Puzzle (TM) and More Puzzle Box Tales on his [...]
February 17th, 2013 → 7:55 pm
[...] I didn’t really have a specific project in mind for a while. Then, one day I remembered a reverse geocache box that was also featured on hackaday, and realized that I could do something similar. The F3 [...]
March 24th, 2013 → 3:09 pm
[...] the other day I read about the “Reverse Geocache” project (http://arduiniana.org/projects/the-reverse-geo-cache-puzzle/) and it gelled a rather important concept for me. It was an example of something that has been [...]
April 18th, 2013 → 12:30 am
[...] The original reverse geocache: http://arduiniana.org/projects/the-reverse-geo-cache-puzzle/ [...]
April 27th, 2013 → 3:32 am
[...] for the Arduino which let you create some amazing projects. A couple of examples that I found are a reverse geocache, and The Inebriator. Both of these are well outside my skill level at the moment, but hopefully [...]
September 22nd, 2013 → 2:41 pm
[...] A while ago, friends of mine got married. Like so often, we tried to come up with some extraordinary cool wedding present. They both enjoy hiking and geo-caching, which inspired us to make the following present. We found an awesome idea online, the reverse geo-caching puzzle. The original description can be found here: http://arduiniana.org/projects/the-reverse-geo-cache-puzzle/ [...]
October 2nd, 2013 → 12:37 pm
[...] this that will return the value in miles, nautical miles, or kilometers. You can use this to create reverse geo-caching gifts or have it trigger something every X [...]
February 11th, 2014 → 2:33 pm
[...] can also combine gifts. The perfect customized or handmade item could fit inside a reverse geocache box which leads your beloved to the location where you’ll be serving your awesome home-cooked [...]
April 24th, 2014 → 10:02 am
[...] Tüftler Mikal Hart hat das Spiel nun einmal etwas anders aufgezogen bzw. [...]
May 28th, 2014 → 5:07 pm
[...] link – Arduiniana – de uitvinder van…. YouTube [...]
November 20th, 2014 → 10:42 am
[...] app we’ll write today is inspired by the Reverse Geocache Puzzle. Intel software engineer Mikal Hart had a friend who was getting married. This friend had [...]
January 31st, 2015 → 1:17 am
[...] je kan ook middels coördinaten de box laten openen. Zoals Mikal Hart laat doen. Hij heeft er een coördinaat ingestopt en pas als je daar in de buurt bent, kan je de [...]
May 29th, 2019 → 7:07 am
[...] It is actually a really cool idea if you or someone you know loves to solve puzzles and mysteries. Then not only could you give them a cool gift, but you could make sure they’ve worked hard to get their hands onto it. The box was originally built by Makal Hart as a wedding gift. On the top it features a button and an LCD display. You can only press the button 50 times, but every time you do it’ll tell you how many kilometers you’re away from the spot you need to be at. You can check out a more detailed look on the box from the creator’s perspective by going here. [...]